Thursday 13 April 2017

4-Shaft Waffle on the RH - a New Tutorial in Progress

I have been working on the tutorial/pattern for 4-shaft waffle on the rigid heddle since March Break. The cloth is woven, lots of pictures taken, and most of the text is written in first draft form.  I just have to finish the hemming process, including taking the step by step pictures, write that section, write the summary "pattern in one page" and theory sections and then I can hand it off to my proof readers, testers and formatters. 

The one on the left is one of the photos in the warping section.  The one on the right is what my space more usually looks like; with my coffee cup, and papers and at least one cat.  Hobbes was the designated "Helpy Helper" for this shift.


 I work in my dining room.  I did tidy up a lot, and camera angles hide a multitude of sins, but chairs are part of dining room life, so I left them.

Seriously, my dining room rarely actually looks like that, even when I'm working on a new project.


A few days later I was trying to get this shot to show how I measure progress.


This time, Seven was on Helpy Helper duty.  She decided Mum needed a "petting break".  When Mum did not immediately comply, this was the result.
Cats are a major cause of poor sheds.

I got the cloth finished and off the loom and then needed to photograph it.  The cats decided it was time for another photo bombing.  I can't do much about the lump on the cloth in the first one, but I think I can crop out the tail in the second one... 


He's slowly learning some subtlety.  Mabye I'll leave it in, but I will crop out my foot, which I just noticed.  Rats.  This is why I usually write as I go, to make sure I have the right pictures that work with the text.  It's hard to go back and replace them.


I had a bit of warp left to play with at a the end which I used to play with another structure that I will do another tutorial on.  The list grows, it never shrinks.  That's probably a good thing.  Hopefully, the new tutorial will be ready to go into the Etsy shop in 4-6 weeks.  That may be a bit optimistic, but we shall see.  I also need to work on a workshop I'm giving at the Ontario Handspinning Seminar in mid June on spinning flax.  It ties in nicely with an article I'm contracted to write for PLY magazine's "Flax" issue, which is handy.  It's going to be a busy Spring and Summer.  Just the way I like it, I think.


Sunday 29 January 2017

Scribbling Warp and Weft

The first "Scribble Scarf for the Rigid Heddle" was done by "scribbling" with the corespun weft yarn on a plain weave ground cloth.  The second scarf, which I am naming "Floating Warp Scarf for the RH" was done with the corespun in the warp.  It has a regular geometric pattern but the principles are pretty much the same.  Here's the basics of how I did both.

The Scribble Scarf has the corespun as a supplementary weft tied down by warp floats.  To make it I set up a ground cloth in plain weave using a wool yarn that would full nicely, Ashford Tekapo 8 ply.  In this case I used a 5dpi heddle for a sett of 5epi.  I put a pickup stick behind the heddle that picked up every other slot thread starting and ending 2 threads from the selvedge.  This gave me "tie down" floats a bit less than 1" apart.  If you were using a different yarn for the ground cloth at a different sett (say 10epi like in the sample I did on the doubled 2/8 Tencel warp), you might pick up every 3rd or 4th slot thread.

To weave the first scarf I wove plain weave for about 1", then put the heddle down (or in neutral, your loom will tell you what works best for it) and brought the stick forward on it's edge.  This raised only the "tie down" warp threads.  I put the corespun in the shed where I wanted it, watching how it made any turns, then pushed the stick to the back of the loom, put the heddle into position for the next plain weave shed, threw a shot of ground weft and beat carefully, watching how the corespun was lying and adjusting tension as necessary.  In the case of the yarns I was using I knew that the Tekapo would full and the corespun would not, so I wanted the corespun to lie in a neat line without slack. 

I chose to leave the stick in place throughout the weaving, never changing the pickup, but there is no reason you couldn't move your floats around if that pleases you, other than making sure the corespun is tied down often enough.  Different yarns might call for shorter or longer floats, only sampling will tell you for sure.  I did find that with the stiff Noble Fibre Mill corespun that it didn't like bending at a 45deg angle, so all my moves were 90deg angles.  A more flexible pattern yarn might be fine with sharper turns.  You could also tie the pattern yarn down more often to allow different shapes like curves.

Putting the corespun in the warp did not go well at first.   I wanted to do a deflected warp technique, but the corespun didn't fit even in a 2.5dpi heddle.  I tried hanging it over the heddle and manipulating by hand, but that turned out to be rather fussy.  If the effect had been what I wanted, I would have fussed, but it wasn't, so I didn't and the loom sat in time out for a good bit.  The other day I was leafing through Mastering Weave Structures by Sharon Alderman (worth it if you really want to understand how different weave structures work, even though it's written for shaft looms there is a wealth of fundamental information that applies to RH looms if you are willing to make the connections) when I ran into "spider weave".  "THAT'S IT" screamed my muse, you don't have to incorporate the corespun warp into the ground cloth, you can just float it like you did the weft.  This time I wanted weft floats to tie down the warps.

I cut 3 lengths of corespun about 3 times the length I wanted my finished scarf to be.  These I folded in half so that I had 6 working ends.  They have a tendency to unravel a bit at the ends so I put knots at the end. I wove my header as usual, and then wove the corespun ends into the header by hand where I wanted them to start, I threw the tails over the heddle and down the back of the loom.  I wove 5 picks of ground cloth weaving in the corespun in by hand by pushing it down into the down shed and passing the shuttle over it.  I hemstitched over 4 warps and 3 picks of weft treating the corespun as a warp end.  This and weaving the corespun into my generous header held it well enough, though I considered pinning it in as well.

To weave the pattern I did a pick up that created 3 weft floats of slightly more than 1" centred across the width for the A pick up.  This stick remained in place throughout.  For the B pick up I used shorter floats at the outer edges and centred the other two floats between the A floats. This stick had to be repicked each time it was needed, but it was quick to do based on the A stick pick up.   I wove about 1" of ground cloth in plain weave ending with an UP shed.  Put the heddle in neutral, brought the stick forward and turned on edge.  This left gaps in the shed where I could push down the corespun then pass the shuttle over them.  Beating that shot was a bit messy and it required a bit of hand tensionning, but the next shot after cleaned things up weftwise and I just adjusted the warps by hand.

Obligatory Helpy Helper Hobbes Picture


I set up a regular pattern and continued along to the end of the scarf.  At the end I repeated what I had done at the beginning, weaving in the corespun for a few shots and hemstitching.  After gentle washing the Tekapo fulled as expected, though more on one end than the other, so I redid the washing.  Once dry I adjusted the corespun, which had kinked in places, and made a twisted fringe with the Tekapo ends.


Step by step instructions for the Scribble Scarf on the RH are available here on the blog on a separate page accessible from the header.  Writing "Step by Step" instructions for the Floating Warp Scarf is my next order of weaving business.  That pattern will be available in my Etsy shop as soon as I'm happy with it, this may take a little while as two of my friends (a tech writer/editor and graphic designer) wish to help me by editing and formatting the "Step by Step" series more professionally.


Thursday 29 December 2016

A Goal for 2017

Kelly Casanova, who has a very useful YouTube channel for Rigid Heddle weaving, posted on the RH Adventure Facebook group asking what our weaving goals for 2017 are.  Mine is to share what I have learned and discovered playing with my RH looms.  I'm going to do this in two ways.  I am planning on liberally borrowing an idea or philosophy from the the late, great, Elizabeth Zimmermann, in the process.  EZ wrote fascinating books on knitting.  In most of them she first described a technique or idea for a project in such a way that "thinking knitters" (as she called them) could work out the details for themselves.  She would then provide a more line by line pattern for "blind followers" (again, her term).  I liked both approaches.  Sometimes I used the "thinking knitter" information to make my own version of a project.  Sometimes it was nice to let her do the working out and just go along for the ride.

So, my plan is to sketch out my ideas and approaches to different techniques here on the blog, freely available to all.  "Independent Weavers" should be able to take the information and run with it and come up with their own projects.  However, sometimes even we "independent" types just want someone else to do the driving.  For that, I will produce patterns for specific projects that illustrate the techniques.  These will have a lot more depth, with clever tips and pointers for sticky bits and lots of photographs, so that pretty much anyone who has direct warped a loom and woven plain weave with some success should be able to follow them.  The patterns will be made available in my Etsy shop.  Prices will vary depending on the complexity of the technique and project.  To that end I shall start with the Scribble Warp scarf I'm working on right now.  Part of the "Support Noble Fibre Mill by coming up with neat projects for their corespun yarn" initiative!


If all goes well, I will finish the scarf tomorrow.  Then I will write the "Independent Weavers" version of the techniques I used here on the blog.  Next I will write the more detailed pattern for the actual scarf and have some friends proof read and test weave a bit.  Hopefully that pattern will be available for purchase on Etsy in a few weeks.  I will also start warping the "4-shaft Waffle" dish towel project I have promised as a pattern.  Bits of that will show up on the blog, then the finalized pattern will go up on Etsy.  I also have a neat idea to combine both warp and weft "scribble" in a "MaD pLaiD" scarf or cowl.  And some Christmas ornaments in pick up Bronson Lace, and maybe something else in Summer and Winter and there's the 3 shaft twill shawl with the buttons you haven't seen yet (because I still haven't done the edging and buttons) and and oh...

Maybe in the meantime I will distract you with some crazy knitting.  Thing Tall loves ties.  To the point he has started to learn to knit because Mum was taking too long to make him a knitted one (there's yet another pattern project! Or 4, part of the reason I hadn't done it yet was a wealth of ideas. mostly woven).  And then, he of the freakishly long (size 16) feet asked very nicely for some socks that were not black, like maybe argyle, please?  Two days before Christmas.  So, Mum thought, having failed to find anything immediately available, what is Christmas Eve without a last minute knitting project?  Thus, I present, The Argyle Tie:

Crazy kid wants it finished.  Intends to actually wear it!  It will need a nice lining and maybe I should have chosen better yarn.  I can still write out the pattern when it is done. 

Saturday 26 November 2016

A Venture into Pattern Writing

Recently I floated an idea on the Facebook group "Rigid Heddle Adventure".  I asked if there would be a market for more of my Rigid Heddle technique tutorials/project patterns.  I got a lot of positive feedback and the answer seemed to be a resounding "YES".  One of the suggestions I got was to put up an example of my pattern writing so that people would have a sense of what they were paying for.  I thought that quite reasonable, but then I needed a fairly simple idea to work with.

At about the same time I started getting to know Lori and Matt from Noble Fibre Mill, a new custom processing Mill in Almonte, Ontario.  Matt's parents run Belfast Mini Mills, his dad designs and builds the equipment and his mum runs their mill and trains new users.  Matt and Lori are just building up their mill, so far they can produce rovings, felt, and a really neat corespun yarn.  They are working towards adding the real spinning equipment, hopefully sooner rather than later.  It was a comment from Lori at the OVWSG Exhibition and Sale that "people think this yarn is really neat, but they aren't sure what to do with it" that prompted me to say "I have tons of ideas, give me some scraps and I'll play with it and make you some samples".  Matt brought me a pretty big ball the next day and I started playing on the remaining black tencel warp from taking the Tom Knisely Sakiori and Zanishi workshop.

I resleyed in a single 10dpi heddle so that the 2/8 Tencel was doubled in each slot and hole.  I tried a whole bunch of things, but my favourite was this:
I call it "Scribbling", it looks really cool, but it's really easy to do.

I warped the loom again, this time with Ashford Tekapo 8 ply.  I chose it because I had it my stash, the colour worked with the corespun, and it's a style of yarn that I think Matt will eventually be able to produce.

This is what I came up with:  a wide loop scarf, plain weave with "Scribbling", and a tidy flat fell seam to join it.  I used a 5 dpi heddle, but you could use every other slot/hole in a 10 dpi heddle.  Scribbling needs 1 pickup stick which you place once then use throughout as needed.


 I didn't have a model handy.  Hobbes offered to help, but then declined to actually wear it.  Too bad, the colour rather suits him.

The scarf finished at about 10-1/2" wide with a 54" circumference.  It's long enough to go twice around the neck.

I have written up the pattern and it is now available on its own page here on the blog, just click on Scribble Scarf for the Rigid Heddle at the top of the page.

Please let me know what you think of the pattern.  Feedback is most welcome.  I want to write patterns that teach new techniques that can then be applied to whatever project you wish.  I have some more Tekapo warp on the loom and I'm trying something else with the corespun.  If it works (the air is a little blue around here at the moment...) I'll write that pattern get it tested and put it in the Etsy shop.  Then, the RH Adventure group wants the pattern for 4 shaft waffle on the RH.  Tea Towels in 2/8 cotton here we come.  My goal is to have a solid pattern by my birthday at the end of January.  We shall see. 

Tuesday 26 July 2016

I Surrender: my first floor loom cloth

When last we met I was testing dye colours and learning to wind a warp.  Since then I have mastered warping on a vertical warping mill (with up to 5 threads at a time, but that's another post), I painted a whole series of small test warps, Jan and I set up her antique Clement loom at my house, Jan helped me warp it and I wove my first cloth on a floor loom.  Also, I might have bought my own floor loom, but that's yet another post after we get it set up...

Here is the array of painted warps on 2/8 cotton:
Once I really get the hang of what I'm doing when I paint, I'll tell you more about the process.  Anyone who knows me, knows I like to measure accurately both so that colours are reproducible and so as not to waste materials like dye stock.  I found very little information to help me with that when it came to painting on cellulose with MX dyes so I am developing my own spreadsheets and procedures; when I'm happy with them, I'll find a way to share them.

My friend Ann came over and we had a play day.  She has a large box of assorted MX dyes, including an alarming number of greens.  I couldn't quite give up the measuring, but these little skeins for weft were mostly thrown together, with the inevitable result that I can't reproduce that lovely warm brown, sigh. I did learn about low water immersion techniques, however.  There are a variety of fibres represented:  2/8 and 2/16 cotton, 2/8 bamboo, cottolin and hemp/cotton.  The bamboo is the shiny, purple one in the middle. 

When Jan came to help me put the warp on the loom she decided we needed something to separate the different painted warps, so I wound narrow stripes of navy and black to divide them.  Jan helped me get the warp on and made sure I was getting the hang of threading then left me to work on my own.  I thread to a straight draw (4-3-2-1) and then sleyed the reed with a variety of setts from 16epi to 30epi.  This took some head scratching and resleying as I realized I hadn't counted width correctly...  It also made tension and beating a little different, but the result was worth it.  I started playing with a variety of weft colours, first in plain weave and then, as I got bolder, a variety of twills.  It took me most of the 3 yard warp to get comfortable throwing the shuttle, mostly because I wasn't putting enough tension on the warp at first.  It is one thing that is quite different on the floor loom, compared to the RH loom.


The final cloth is beautiful in a random kind of way.  Everyone keeps asking me what it will be and I tell them it already is what it was intended to be:  a learning experience and a reference. 

I can feel and see the differences in the setts, wefts and weave structures. I can see how the weft colour and size interacts with the different colours and how the stripes show up. It provides a ton of information I can use to plan projects and I learned a ton winding warp, painting warp, dressing the loom and weaving.

And yes, I actually like the floor loom.  This one isn't as noisy as many looms are and boy, is it fast!  I think the fact that she is an antique adds to her appeal.  She is a direct tie up jack loom, a simple workhorse who still works very well despite her age - she is somewhere between 100 and 115 years old. She started her life in a nunnery in Quebec and was used there well into the mid 20th Century, Jan adopted her at the Great Glebe Garage Sale in the late 1980's but she has been in storage a lot since; she deserves to be used.  She is missing some original hardware, but my Dad (the machinist) and Jan's husband Glenn (the blacksmith) can make more authentic replacements at some point.


Tuesday 31 May 2016

Warning: This Bunny Hole has LONG Tunnels

That should have been on the entrance to this weaving bunny hole I fell down some years ago.  I've been wandering around and getting into mischief here for quite some time but really, somebody should have warned me about the wretched side tunnels...

I started weaving to work with my handspun.  Thus far, only a very few of my woven projects have used handspun.  I found that I like to weave with cotton, but I don't like spinning it.  I also like new challenges.  Recall the conversation with Mandy on the way home from Ogdensburg when we picked up my Swatch Maker loom?  I decided to try Tencel.  Seems fairly straight forward.  Except, I never, ever, seem to take the straight forward route, do I?  ADHD has it's "creative advantages", ahem.  I decided I wanted to make painted warps.  But I know very little about fibre reactive dyes for cellulose fibres so I did a LOT of research.  I may be impulsive, but I am also a perfectionist, so when I get an impulse there is usually a lot of research before I actually dive in.  And, oh my, I have dived in DEEP this time.  This post covers barely the entrance to this particular tunnel, so stay tuned.

I learned from Paula Burch's excellent site "All About Hand Dyeing" a LOT about procion MX fibre reactive dyes.  Paula is a tie-dyer, not a yarn dyer, but she still had plenty of information to get me started.  What she didn't have was numbers.  I am a numbers person.  I like to measure and I don't like to waste.  For that, I found Diane Franklin's Dyeing Alchemy.  The book is very good, though again, it's about fabric dyeing, not yarn.  The spreadsheets are AWESOME!!!  I love a good spreadsheet and I will be able to adapt one of them for painting without much trouble, I think.

I ordered 25g jars of 8 colours of MX dye from G&S in Toronto, choosing the colours based on Paula Burch's table of "pure" MX dye colours.  There are 14 pure colours, the rest are mixes made by the various suppliers.  And I enlisted my friend, Sandy, to go on this adventure with me.  There was going to be sampling, a lot of sampling, a crazy amount of sampling.  I did a bunch of playing with the spreadsheets and made a plan.  2g samples of Tencel (I bought some from Brassard, then my friend Judith gifted me another pound cone to play with) are 15 yards long on my niddy noddy.  I made a lot of skeins of Tencel and some of cotton for comparison.  The first Friday we got together at the Guild Studio Sandy made a lot more skeins and we did value runs for Hot Pink, Orange, and Fuchsia and we did a mixing gradient of Hot Pink and Orange which was reported to give a truer primary red.  The skeins tangled rather terribly, but otherwise it went very well and we were pleased with our results. 
The trouble with fibre reactive dyes is they don't keep in solution very long, so I did some more at home that weekend to use up what we had.  I did the Royal Blue value run and the mixed runs of purples using the Royal Blue against the Hot Pink, Fuchsia and a mix of Hot Pink and Orange.

I made a lot more skeins of Tencel and cotton and figured out a way to tie them that I hoped would result in less tangling.  Fibre reactive dyes need a lot of stirring and washing and rinsing, which means a lot of moving skeins around in water.  We got together again on a Friday, this time our friend, Catherine, joined us.  We made more value runs with Bright Yellow, Golden Yellow, Ceruleun Blue and Black and we did the mixing gradients of greens with the blue and both yellows, and of oranges with Fuchsia and the yellows, and Fuschia and the blue.  That was plenty for one day.


At home, I finished the oranges, greens and purples that weren't done yet.  I thought I was doing it alone, but, true to form, Hobbes turned up to be the day's Helpy Helper.  He thought maybe he'd like to try purple highlights on his ginger.  I convinced him that he is gorgeous the way he is and, after checking the set up thoroughly to satisfy himself that I could manage, left me be to get on with it.

Now we have a set of samples to evaluate and work from and we have learned a lot.  I need to get them into a sample book so I can show them to you in an organized way.  There will still be more samples and then we will start sampling actual warps.  But first, Jan is going to teach me to use a warping reel!

Sunday 29 May 2016

Sampling

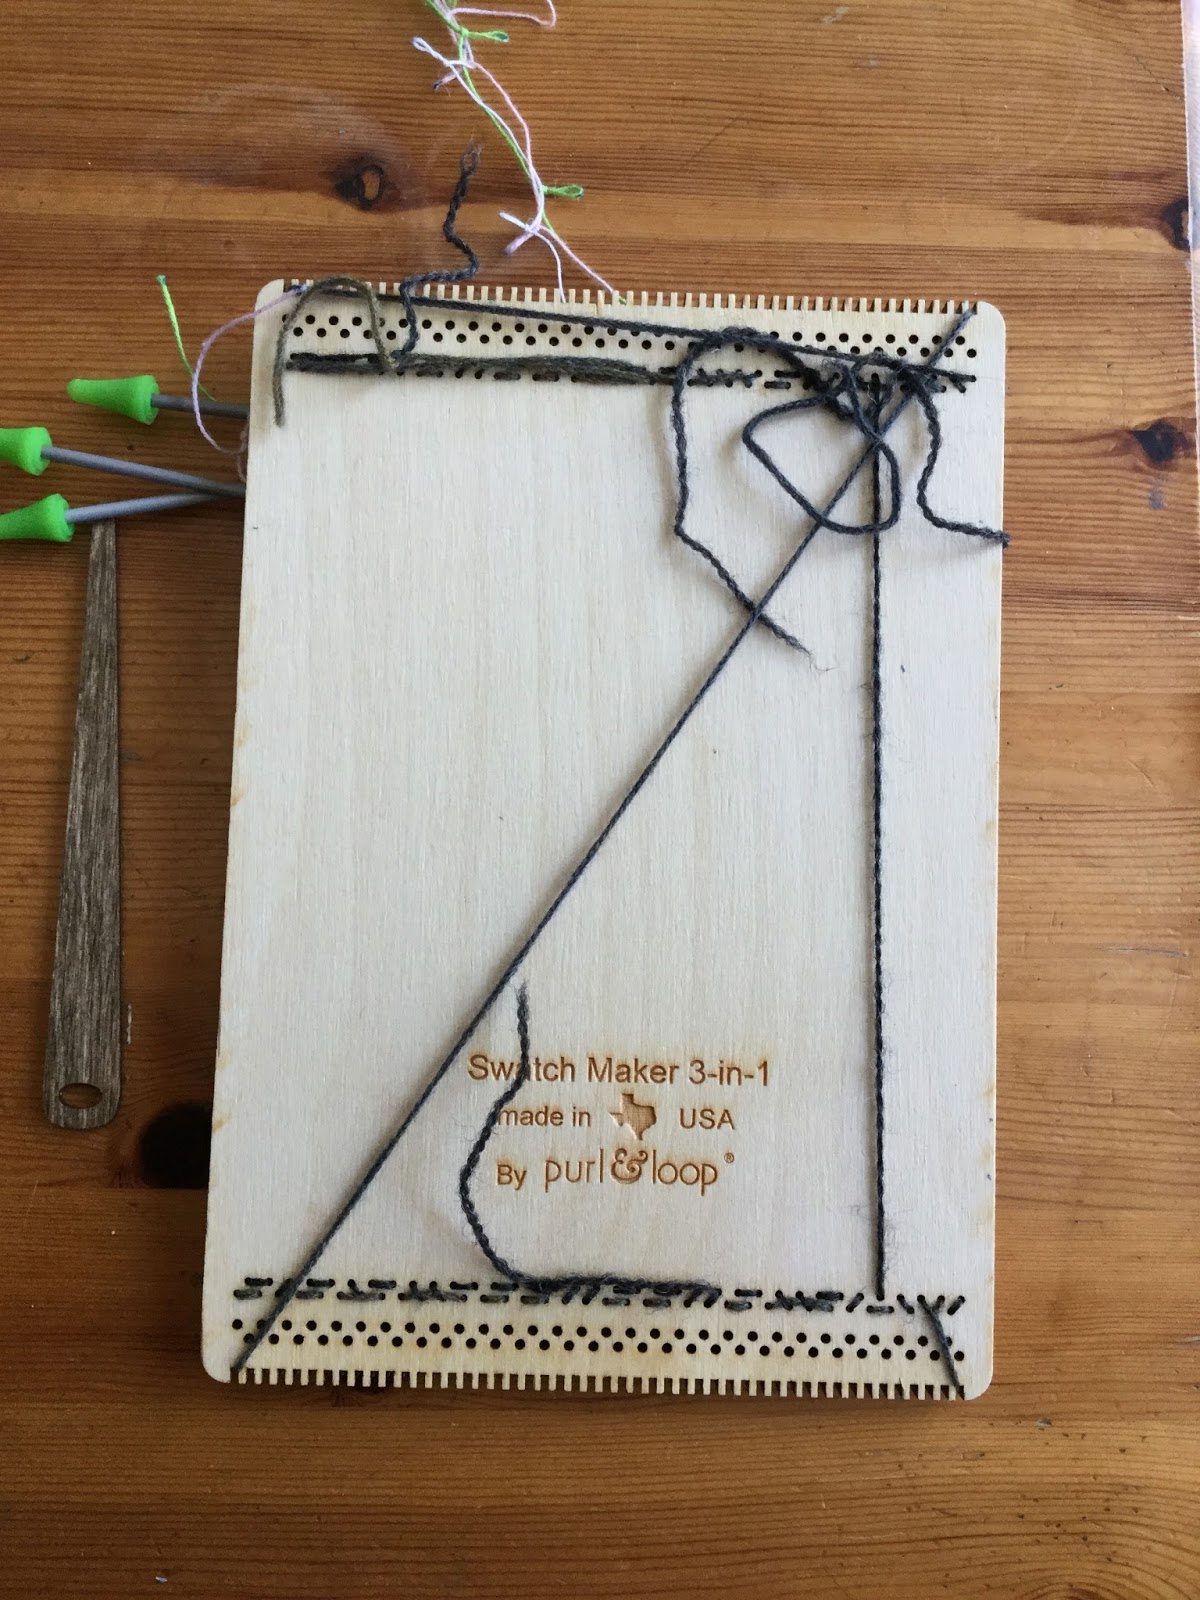
Back in January I ordered a "Swatch Maker 3 in 1" loom from Purl & Loop.  I know I should sample, but the loom takes a lot of yarn to do that.  The little Swatch Maker takes a lot less yarn and I can get a decent sample that will tell me quite a bit in not a lot of time.  And it is quite portable.  It arrived in Ogdensburg, NY at "My US address" and my friend, Mandy, and I went on a little road trip to pick it up.  Ogdensburg is just across the border from Prescott, ON, about 45min from here.  Mandy also had parcels waiting for herself so we shared the trip. 

Mandy has been weaving a very, very long time.  She belongs to the "Complex Weavers" group and mostly weaves on 8 or more shafts.  She has come around to my joy in my RH looms and does admit that they have a real place in weaving.  She has finally stopped asking when I will try a "real loom" and accepts that I already have more than half a dozen quite real looms, which together take less space than her smallest floor loom *.  She is, however, a brilliant travel companion and gladly shares her wealth of weaving knowledge.  She thought the little Swatch Maker was a very good purchase and looked forward to seeing it in use.  On the way home we talked about projects and yarns and sett (I'm still struggling with that one, hand me a knitting yarn and I can usually guess within one or two sizes what will give the right gauge and feel but I am totally lost with weaving structures and yarns, Mandy says it will come with experience).  Somewhere about Kemptville I was firmly resolved to try Tencel next, but that is a different tunnel off this bunny hole I am happily lost in and I will tell you about that another day, or days, or maybe over the next few months, it's a REALLY, REALLY long tunnel and I'm a little nervous and a lot excited about where it might end up...

*(In case somebody is keeping score:  3 RH looms, 1 inkle, 1 Swatch Maker, 1 Brio 2-shaft (designed as a toy, but it really does work!  Thing Tall made a lovely long swatch on it when he was about 8), 1 4 shaft Guild Craft and Thackery (an antique, I haven't actually used it yet, should try it this summer and tell you more about it) plus some peg looms, another little toy tapestry loom, an old looper loom...  If it makes interlacements, it's a REAL LOOM).

Back to the Swatch Maker:  the first thing I realized is that I am not fussed for needle weaving, so this little beast needed some heddles.  First try was a bit less than successful, but I googled (I do so love the Google) and found a very good video by Noreen Crone-Findlay on YouTube.  I decided to use dpns for the heddle rods, so I needed some end caps, otherwise known as point protectors.  Wool-Tyme had notions on sale for February, so off I went.  And discovered they were having their annual inventory sale - 20% off everything.  Those point protectors ended up costing $164! - $8 for two packages of 4 point protectors, $75 for yarn for a new gansey for Himself and $80 for a totally impulsive purchase of Lang Novena for a woven shawl.  I NEVER do that.  I always have a plan.  I bought 5 skeins in total not really sure how I was going to use it. 

I had a think, I pulled yarn off the skein and discovered that each colour was a good 2 yards long and the full repeat was something like 15 yards.  Now how was THAT going to work?

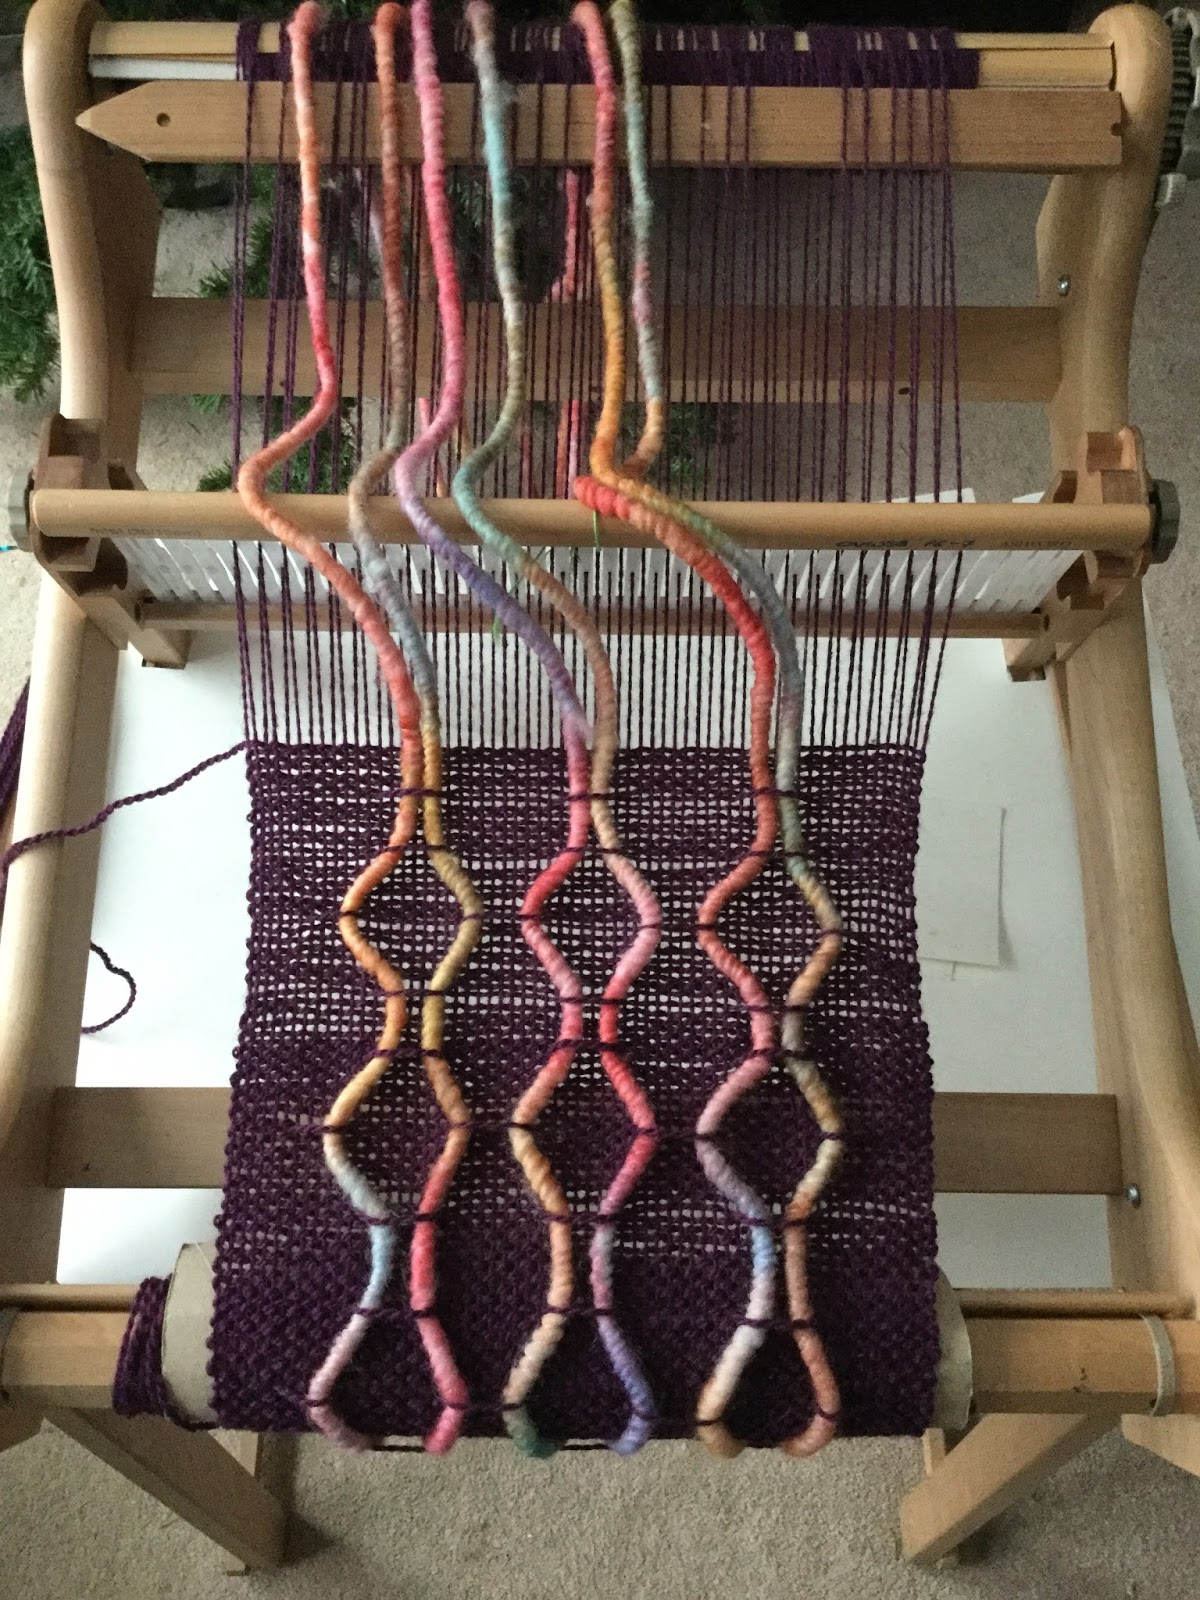
The Rigid Heddle Adventure group on FaceBook pointed me to a lovely little online book called "A Twill of Your Own" that shows a wide variety of possibilities with colour and weave effects from a wide variety of twill structures on 2-8 shafts, including a nice section on 3 shaft twills.  3 shaft patterns, now you're talking, my RH loom is MADE for 3 shaft.   Unfortunately the book has the pictures turned 90deg for some reason.  The warp runs horizontal in the picture, which meant the pattern that most caught my eye wouldn't work the way I saw it.  But, it gave me a starting point.  I spent some quality time with iWeaveIt and came up with a structure that looked promising.  I plotted out a few variations of the striping and then warped the Swatch Maker.  I went to Wabi-Sabi and bought some Ashford Tekapo 3-ply in Charcoal Grey for the background warp and the weft.  It's a LOT cheaper and it shows off the Novena very nicely.

 Here it is warped with some of the continuous string heddles installed.  The section of yarn that came off first from the skein had the least contrast in colour to the background Tekapo, so it's harder to see the warping pattern, but it's there.


 This is the back.  You are supposed to take the yarn all the way across the back of the loom, but that takes more yarn and this did seem to work just fine.


Here is the finished and washed swatch.  I ended up choosing a variation on the more widely spaced striping over to the left.  The sample tells me that my sett (12epi) makes a nice, drapey cloth, and how much shrinkage to expect.

From there I designed a shawl which is still on the loom.  I'll tell you all about it when I get it done.